|
The "CAN" window is used to simulate CAN networks.

Simulating the CAN network can be broken down into two tasks - receiving CAN messages from the Simulator device and transmitting CAN messages to the Simulator.
Sent from Simulator
The "Sent from Simulator" list shows the CAN messages received from the Simulator (sent with canSendMessage in VPL).
The messages are listed in the order they are received - with the oldest at the top and the newest at the bottom.
When the simulated CAN network is in "Monitor" mode, the received messages are listed with a light grey background, and the canSendMessage function will fail with a timeout.
ID
This column contains the identifier of the received message.
The identifier is displayed as a hexadecimal number.
Data
This column contains the data bytes of the received message.
The bytes are displayed as hexadecimal numbers.
Monitor
This check box is used to select Monitor mode for the CAN network.
Monitor mode is a way for the simulated CAN network to listen and receive messages without interacting with the Simulator.
This is the same as Monitor mode in the VPL application - see canOpen.
Clear
This button will remove all the received messages from the list.
Send to Simulator
The "Send to Simulator" group is used to manage the CAN messages that are available for being transmitted to the Simulator.
The messages that show up in green are activated and will be sent to the Simulator.
An existing CAN message can be edited by double-clicking on it.
Name
This column contains the name of the message.
Naming the messages is not required but can make it easier to recognize what it represents.
Occurrence
This column contains the frequency with which the message will be sent to the Simulator once it has been enabled.
ID
This column contains the identifier of the message.
The identifier is displayed as a hexadecimal number.
Data
This column contains the data bytes of the message.
The bytes are displayed as hexadecimal numbers.
New
This button will create a new message.
The CAN message dialog (see below) is used to configure the new message.
Delete
This button will remove the selected message.
Send / Enable / Disable
This button will show a different title dependent on the occurrence of the selected message.
When the selected message has an occurrence of one, the button will show "Send", and the message will be sent to the Simulator when pressed.
When the selected message is disabled (black text), the button will show "Enable", and the message will be enabled when pressed. An enabled message will be sent to the Simulator repeatedly with the configured interval.
When the selected message is enabled (green text), the button will show "Disable", and the message will be disabled when pressed. A disabled message will no longer be sent to the Simulator.
Import
This button will import a previously exported collection of messages.
The new collection of messages will replace the current messages in the group.
Export
This button will export the messages from the group as a collection of messages.
The CAN message collection is stored in a human readable XML file.
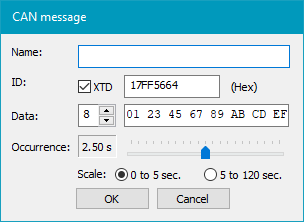
The CAN message dialog is used to configure a CAN message.
It is used both when creating a new message and editing an existing one.
Name
The name of the message.
The message is not required to have a name, but it can make it easier to differentiate between the messages.
ID
This is the message identifier.
Note that the ID is typed as a hexadecimal number.
Data
This is the data contents of the message.
The order of the bytes are the same in the editor as in VPL with byte 1 at the leftmost position and byte 8 at the rightmost position.
Occurrence
This is how often the message is sent to the Simulator when enabled. (See Send above)
The value of each tick on the slider depends on the scale.
Scale
This is the scale of the occurrence slider.
|